Accessing and Managing Requests Assigned to You
Requests Overview
Requests centralize all your organization’s Snippet suggestions, making it easy to collaborate, keep content accurate, and maintain consistency.
Team members can submit requests for new Snippets to grow your library or changes to existing Snippets to help keep them up to date. You can submit complete Snippet content, formatted exactly as you need it, along with labels and abbreviations, or simply describe what you need in a comment. Requests go directly to the assigned Organization admin or members with Can Edit or Can Manage permission for that Snippet Group. They are instantly notified and can review, track, and resolve requests assigned to them right in TextExpander.
By keeping all suggestions and discussions in one place, Requests closes the content collaboration loop and helps your organization maintain quality and consistency without having to manage Snippet changes in external apps.
Organization admins and members with “Can Manage” or “Can Edit” permission on an Organization Snippet Group can be selected as the assignee for a request.
Requests is available on Business, Growth, and Enterprise plans. Enterprise admins have additional controls to enable or disable Requests at either the Organization level or Snippet Group level. Learn more about admin controls for Requests here.
Not able to play the video? Click here to watch the video
Receiving Requests
When a request is assigned to you, you’ll be instantly notified in two ways:
- Email notification
- In-app notification
- Recommended: Have in-app notifications turned on so you can stay up to date with the latest updates on your team’s requests. Learn how to check your notification settings here.
You can also track all your requests from one central location, in the Open Requests tab in Snippet Activity. To access the Open Requests tab:
- Log in to app.textexpander.com
- Select “Snippet Activity” in the left side bar under your organization’s name
- Click on “Requests”
In the Open Requests tab, you can:
- See all open requests for your organization by selecting “Anyone” from the “Assigned to” dropdown
- See all requests assigned to you by selecting your name in the “Assigned to” dropdown
- View requests assigned to other members in your organization by selecting their name in the “Assigned to” dropdown
- Click the three-dot menu next to any request to view it, or resolve requests assigned to you
Reviewing Requests Assigned to You
When you click to view a request (either from a notification or the Open Requests tab), you’ll be taken to the relevant Snippet
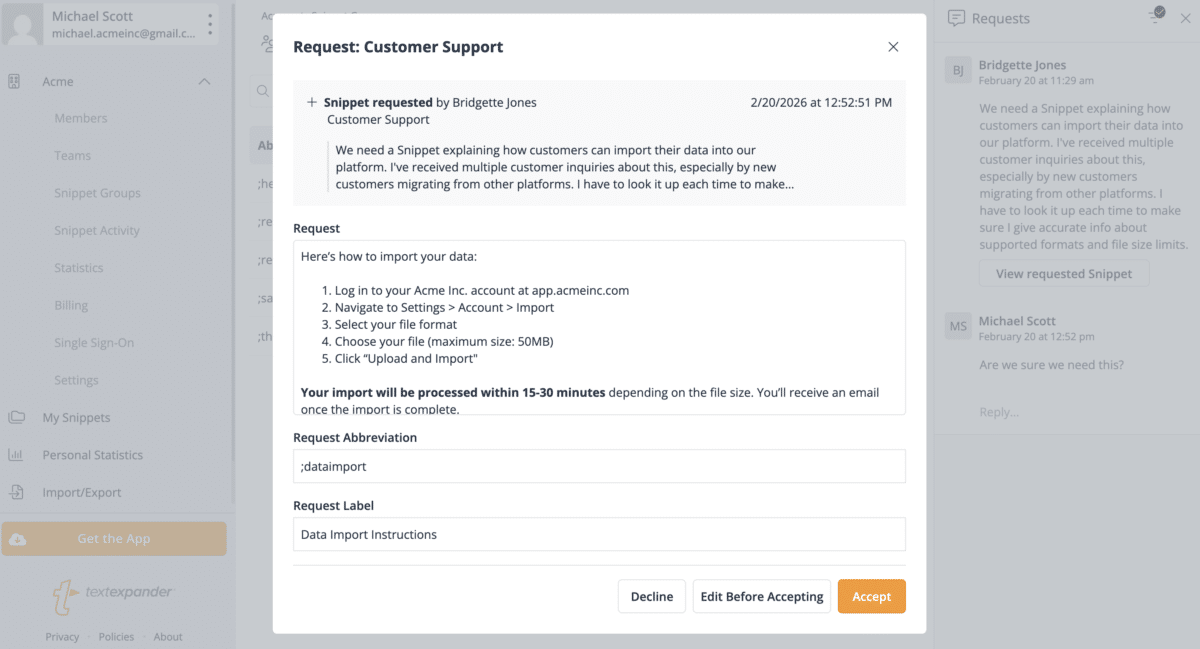
For New Snippet Requests
From the Requests panel, click the “View Requested Snippet” button to open a popup window. You’ll see:
- The requestor’s comment explaining the need
- Complete Snippet content (if provided), formatted and ready to review
- Suggested label and abbreviation (if provided)
From there, you can:
- Close the popup window and reply directly to the requestor from the Requests side panel
- Approve the request as-is by clicking on the orange “Accept” button
- Make refinements before adding it to your organization’s library by clicking on “Edit Before Accepting”
- Decline the request by clicking on the “Decline” button. If you decline the request, you can provide an explanation that will be sent to the requestor after clicking the “Decline” button
Not able to play the video? Click here to watch the video
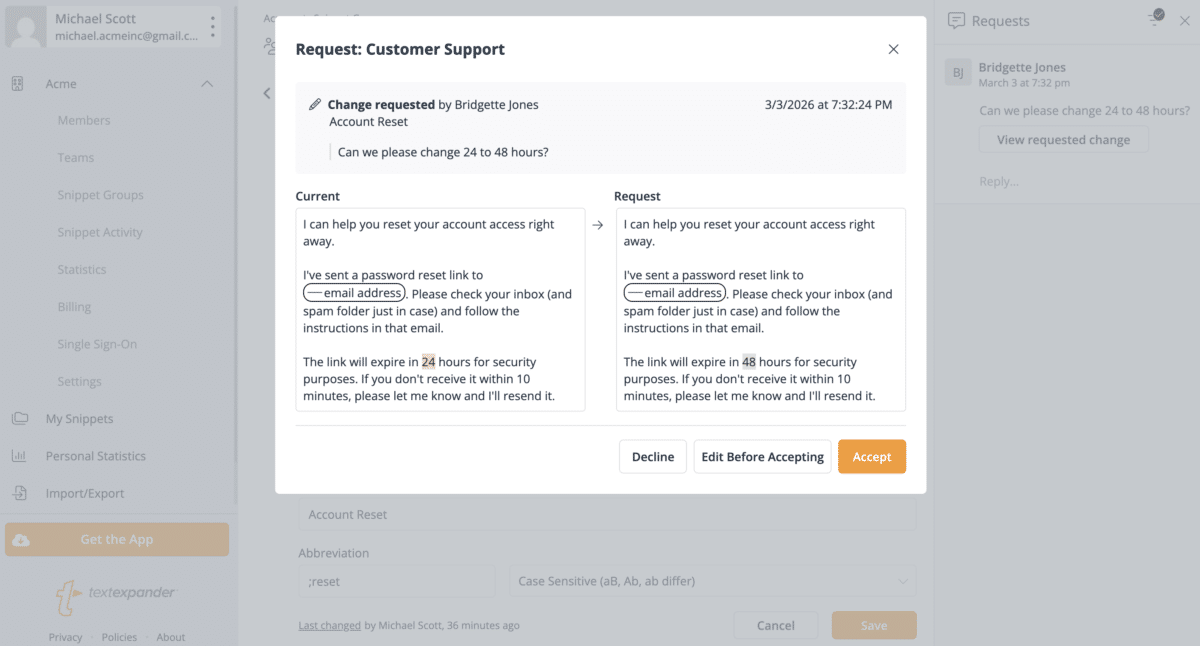
For Edit Requests
From the Requests panel, click the “View Requested Change” button to open a popup window. You’ll see:
- The requestor’s comment explaining what needs to change
- A side-by-side comparison showing the current Snippet content and proposed changes
- Green highlighting for additions or changes
- Red highlighting for deletions or content being replaced
- The ability to approve the request as-is via the orange “Accept” button or to make refinements before adding it to your organization’s library via the “Edit Before Accepting” button
You can also close the popup window and reply directly to the requestor from the Requests panel.
Not able to play the video? Click here to watch the video
Managing Requests
In the Requests panel, you can:
- See open requests and details of each request
- Reply to the requestor and view the conversation history
- Filter requests by who they are assigned to and status
- Change who the request is assigned to
- Resolve open requests that don’t contain Snippet content
- View requested Snippet content and changes to existing Snippets before approving it
- Click on the “View requested Snippet” or “View requested cshange” button to view the suggested Snippet content/edit. From the popup window, you can review the Snippet and accept it, edit it before accepting, or decline the request.

Replying to Requests
To reply to the person who submitted the request:
- Click “Reply…” in the Requests panel.
- Type your message.
- Click the orange arrow to send your message.
The original requestor will be instantly notified via email and an in-app notification. You can view the full conversation history in this same panel.
Approving, Declining, and Editing Snippet Requests
For New Snippet Requests
If a request contains complete Snippet content, once you’ve reviewed it, you can:
- Click “Accept” to add the Snippet to your organization’s library immediately
- Click “Edit Before Accepting” to make refinements (adjust wording, modify the abbreviation, update formatting) before approving
- Click “Decline” and provide an explanation as to why the request has been declined
- Close the popup window and reply to the requestor if clarification is needed
Once accepted, the Snippet is immediately available in your organization’s library for team members to use.
For Snippet Change Requests
Review the side-by-side comparison of current and proposed content, then:
- Click “Accept” to update the Snippet with the suggested changes
- Click “Edit Before Accepting” to make adjustments to the proposed changes
- Click “Decline” and provide an explanation as to why the request has been declined
- Close the popup window and reply to the requestor if clarification is needed
Once accepted, the Snippet is immediately updated in your organization’s library.
Resolving Requests Without Snippet Content
If a request is submitted without Snippet content, you will need to create the Snippet. Once you’ve addressed a request or have decided to not take action, you can mark the request as resolved.
There are two ways to resolve a request:
- From the Snippet/Snippet Group: In the Requested Snippets panel, click the Resolve request checkmark.
- From the Open Requests tab: Find the request, click the three-dot menu, and select Resolve request.
Resolving the request removes it from your active list and notifies the requestor that the request is complete. If the requester is not receiving notifications, have them check that they have notifications enabled by following these steps.
Additional details
- Organization admins are by default Snippet Group admins so they can manage any Organization Snippet Group and can manage/resolve any request.