Proposing New Snippets and Snippet Changes with Requests
Requests Overview
Requests centralize all your organization’s Snippet suggestions, making it easy to collaborate, keep content accurate, and maintain consistency.
Team members can submit requests for new Snippets to grow your library or changes to existing Snippets to help keep them up to date. You can submit complete Snippet content—formatted exactly as you need it—along with labels and abbreviations, or simply describe what you need in a comment. Requests go directly to the assigned Organization admin or members with Can Edit or Can Manage permission for that Snippet Group. They are instantly notified and can review, track, and resolve requests assigned to them right in TextExpander.
By keeping all suggestions and discussions in one place, Requests closes the content collaboration loop and helps your organization maintain quality and consistency without having to manage Snippet changes in external apps.
Not able to play the video? Click here to watch the video
How to Request a New Snippet be added to a Snippet Group
From the TextExpander web app:
- Sign in to app.textexpander.com
- Select “My Snippets” in the left sidebar.
- Find the Snippet Group where you want the new Snippet added.
- Click on the teal “Request Snippet” button in the upper right corner.
- Note: If you have “Can Edit” or “Can Manage” permission on the Snippet Group, this option will be within a dropdown under “New Snippet”.
- In the comment box, describe your request and why this Snippet is needed.
- Assign the request by selecting one or more users from the dropdown menu.
- (Optional) Create the Snippet:
- Choose your content type
- Enter the Snippet content with your desired formatting, including Fill-ins, Date Picker, or other macros
- Add a label and an abbreviation
- Click “Submit.”
From the TextExpander Mac or Windows app:
- Open your Mac or Windows app
- In the left sidebar, select the Snippet Group where you want the new Snippet added.
- Click the teal “Request Snippet” button. This will take you to the TextExpander web app.
- Note: If you have “Can Edit” or “Can Manage” permission on the Snippet Group, this option will be within a dropdown under “New Snippet”.
- In the comment box, describe your request and why this Snippet is needed.
- Assign the request by selecting one or more users from the dropdown menu.
- (Optional) Create the Snippet:
- Choose your content type (Plain Text, Rich Text, or Picture)
- Enter the Snippet content with any formatting you need
- Add a label and an abbreviation
- Click “Submit.”
From the TextExpander Chrome Extension:
- Click on the Chrome extension icon in your toolbar.
- Select “Open TextExpander” from the menu.
- In the left sidebar, select the Snippet Group where you want the new Snippet added.
- Click the teal “Request Snippet” button.
- Note: If you have “Can Edit” or “Can Manage” permission on the Snippet Group, this option will be within a dropdown under “New Snippet”.
- In the comment box, describe your request and why this Snippet is needed.
- Assign the request by selecting one or more users from the dropdown menu.
- (Optional) Create the Snippet:
- Choose your content type (Plain Text, Rich Text, or Picture)
- Enter the Snippet content with any formatting you need
- Add a label and an abbreviation
- Click “Submit.”
Once your request is submitted, you’ll see it in the “Requested Snippets” side bar. Click “View requested Snippet” to see your full request.
Not able to play the video? Click here to watch the video
How to Request a Change to a Snippet
From the TextExpander web app:
- Sign in to your TextExpander.com account.
- Select “My Snippets” in the left sidebar.
- Find the Snippet you want to change.
- Click the teal “Request Change” button in the upper-right corner.
- In the comment box, describe what needs to be changed and why.
- Assign the request to one or more users from the dropdown.
- Edit the Snippet content in the Snippet editor and update the label or abbreviation if needed
- Click “Submit.”
From the TextExpander Mac or Windows app:
- Open your Mac or Windows app
- In the left sidebar, select the Snippet you want to change.
- Click on the “Request change” button. This will take you to the TextExpander web app.
- In the comment box, describe what needs to be changed and why.
- Assign the request to one or more users from the dropdown.
- Edit the Snippet content in the Snippet editor and update the label or abbreviation if needed
- Click “Submit.”
From the TextExpander Chrome Extension:
- Click on the Chrome extension icon in your toolbar.
- Select “Open TextExpander” from the menu.
- In the left sidebar, select the Snippet you want to change.
- Click on the “Request change” button.
- In the comment box, describe what needs to be changed and why.
- Assign the request to one or more users from the dropdown.
- Edit the Snippet content in the Snippet editor and update the label or abbreviation if needed
- Click “Submit.”
Once your request is submitted, you’ll see it in the “Requested Snippets” sidebar. Click “View requested change” to see a side by side comparison of the current Snippet and your requested change(s).
Not able to play the video? Click here to watch the video
Finding and Managing your Requests
You can track all open requests in the “Open Requests” tab in the webapp:
- Sign in to your account at app.textexpander.com.
- In the left sidebar, click “Snippet Requests”.
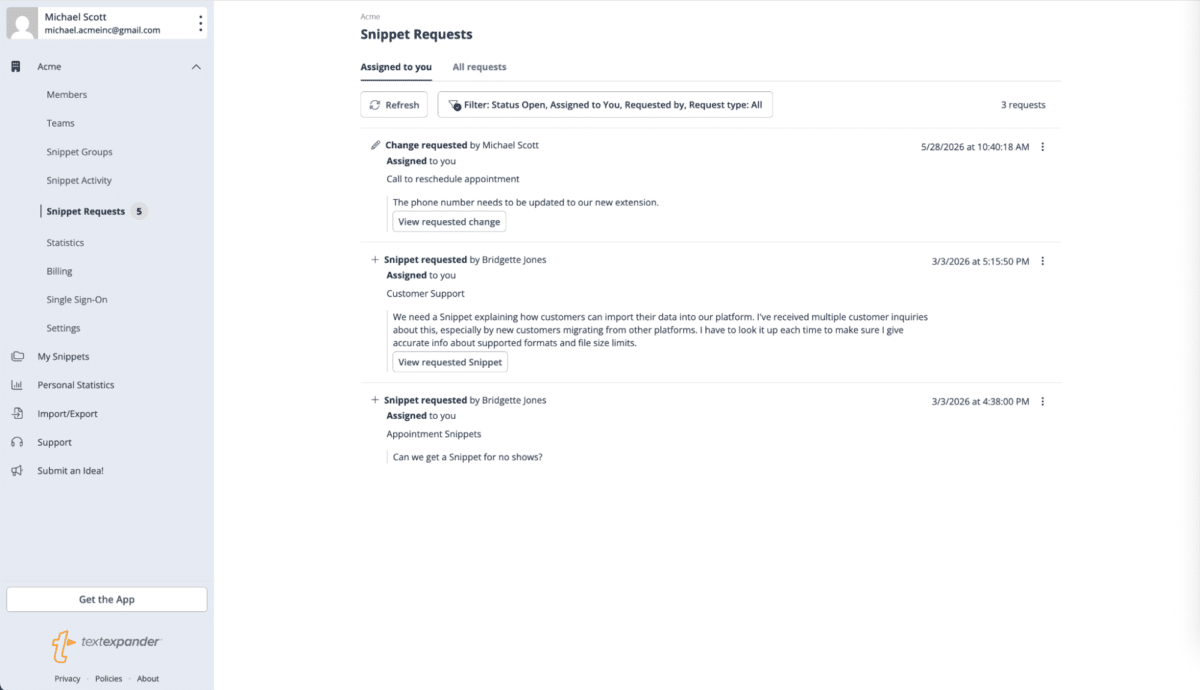
Snippet Requests has two tabs:
- Assigned to you: Open requests currently assigned to you, across every Snippet Group you have access to.
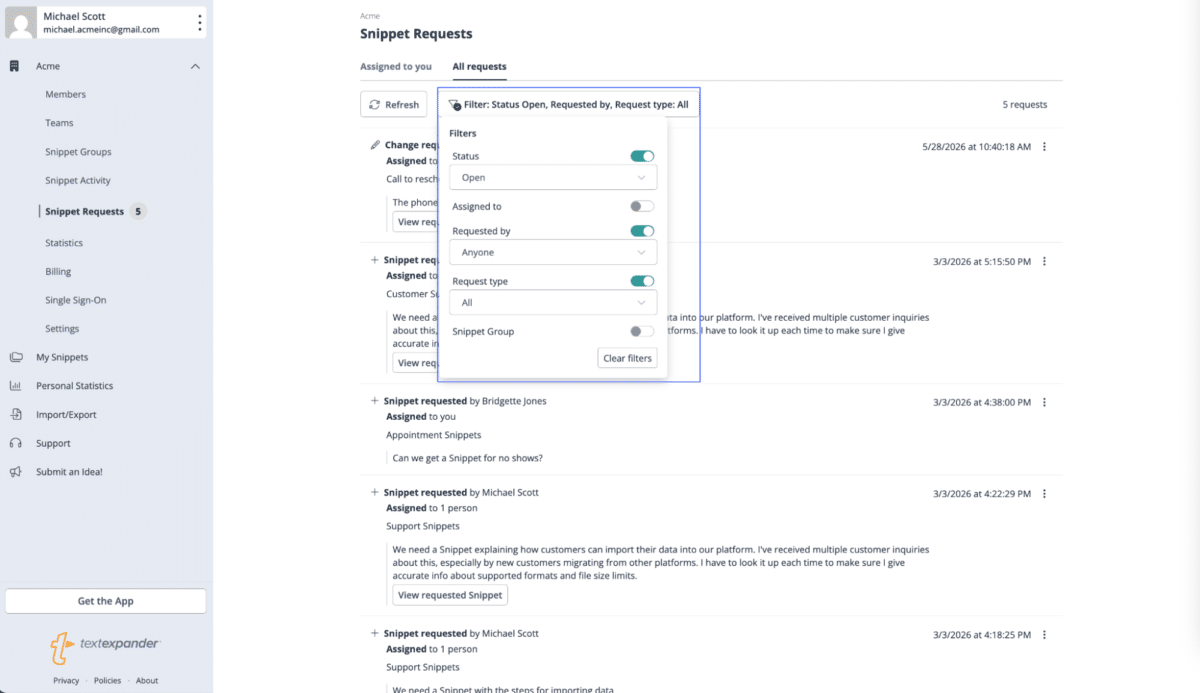
- All requests: Every request across the organization, regardless of assignee. Use the filter panel on this tab to narrow by Status, Assignee, Snippet Group, Requester, or Request type.
The “Assigned to” filter under “All requests” can also be set to any teammate, not just yourself. If you only need your own queue, Assigned to you is the faster path.
Know when something needs your attention
A number badge appears next to Snippet Requests in the sidebar whenever you have a request assigned to you that needs a review. If nothing is currently assigned to you, you’ll still see the Requests nav item without a number next to it.
Note: The badge count updates when you refresh or navigate within the app but is not a live, real-time counter. If you’re not seeing a badge you expect, try refreshing the page.
Filter your Requests queue
Click Filter at the top of the Snippet Requests page to open the filter panel. Toggle on any of the following, then set its value:
- Status
- Assigned to (me or a specific person)
- Requested by
- Request type (New Snippet or Edit)
- Snippet Group
You can also track requests you’ve personally submitted from the Requested Snippets sidebar on any shared Snippet or Snippet Group. Click the Requests button to open it. When someone replies to, resolves, accepts, or declines a request you’re involved in, you’ll be notified by email and in-app notification.
Additional Details
- When someone replies to a request you submitted, or resolves, accepts, or declines your request, you’ll be instantly notified via email and an in-app notification. Notifications must be turned on in order to receive in-app notifications. Learn how to check your notification settings here.