Skip to content
  • Pricing
  • Download
  • Support
  • Features
  • Blog
  • SIGN IN

Guide: How to Set up a TextExpander Organization

What is a TextExpander organization?

A TextExpander organization is how you keep all your TextExpander users and snippet groups in one place. This has the benefit of making snippet sharing and team member onboarding easier, and central billing and usage statistics possible.

If you want a team of any size to use TextExpander, you should set up an organization to do it.

If you’re bringing a team onto TextExpander (since you are here, you probably are) you should review our Rollout Guide first.

If you are upgrading, or switching from another text expansion app, you should also review our guide on transitioning to TextExpander.

Set up an organization: Overview

Briefly, here are the steps to set up an organization.

Step 1. Create an organization.

Step 2. Add some members.

Extras:

  • If you have multiple departments or teams coming on, you should invite all the team leads first, have them set up shared groups for their teams, then they can add their team members to TextExpander.
  • Set an Organization Domain for easier onboarding. Anyone using a company email address to create a TextExpander account automatically joins the organization.
  • Use Single Sign-On (SSO) for easier onboarding.

Step 3. Add some groups.

  • Create some snippet groups.
    If you have a previous version of TextExpander, you likely have those groups already.
  • Set default editing permissions for new team members.
  • Add the groups to the organization.
    This centralizes management of the group and increases the granularity of the usage statistics.

Step 4. Share groups with members.

  • From each group, add some organization members, or invite TextExpander users outside the organization.
  • Adjust permissions per member as necessary.

Extras:

  • Set up Teams, which are like sub-organizations within the main TextExpander organization, to ease onboarding per department.
  • Select some groups to automatically be shared with everyone with auto-joined groups.

Step 5. Set up billing.

When you first create an account you can pick a plan and set up your payment details. If you choose Test Drive, you can set up your billing later. Do so from the Billing tab in the organization’s settings. Learn more about billing and how credits work in How Does Billing Work?

Final piece:

Once you have your organization set up, you may be interested to see how its doing. You can track snippet usage statistics in the organization settings.

Set up an organization: Step by Step

Step 1. Create a TextExpander organization

  1. Sign in to your TextExpander.com account. If you don’t have an account on TextExpander.com, create one first.
  2. Click on your account name in the upper right corner, then select Organizations from the menu.
  3. Click “Create An Organization.” A popup will appear:
    A. Name your organization. We suggest either your company name, such as “Acme Inc.” or your company and department if your whole company will not be in your TextExpander organization, such as “Acme Inc. – West Coast Support Team.”
    B. Select a payment plan, either monthly or annually. You can also choose the 30 day trial with Test Drive.

Once complete, you’ll find yourself in the organization’s settings.

Depending on the size of your team, your next step is to set up some groups to share or to invite your team leads who will each be in charge of setting up groups for their teams and inviting their teams.

We suggest having some snippet groups in the organization before adding the bulk of your team members. This way, when they first set up their TextExpander accounts they’ll have organization snippets to work with immediately.

Step 2. Add members to the organization

  1. Open the organization settings. To do so, sign in to your TextExpander.com account, choose the Admin menu in the upper right and select Members.
  2. Click the Add Member “+” button.
  3. Enter the email addresses of those you wish to invite. You can paste in a list separated by commas. Each person will receive an email instructing them to create a TextExpander account and accept the invitation to the organization.

Organization Permissions

New members don’t have any organization permissions by default. Once they join the organization you can assign them the admin or billing roles.

Permissions:

  • Organization Admin
    Each organization needs at least one member to be an organization-level admin, there can be as many as you like. Organization admin can function as group admin plus they can access the organization settings to:


    • add and remove members of the organization
    • set members’ organization-level permissions to add and remove other admin
    • create and manage Teams
    • manage and delete organization groups
    • view organization statistics
  • Billing
    Each organization needs at least one member to have the billing role. The billing role will receive payment notices and manage the payment method. See How Does Billing Work?

About Members

A TextExpander user becomes an “organization member” once they accept the email invitation to join. There are a couple exceptions where a TextExpander user becomes a member of your organization as soon as they create their TextExpander account:

  • If you turn on an Organization Domain
  • If you turn on Single Sign-On (SSO)

As an organization member, organization admin and group admin can share groups with them immediately without any further input from the member. A member can later remove themselves from the group, but cannot delete the group unless they are an admin.

About Members’ Individual Snippet Groups: Personal vs Private Snippets

Members can create their own snippets to use. Any individual’s un-shared snippets are in personal groups, and TextExpander Admin will have limited access to them in the form of seeing their usage statistics in the statistics panel. This is true in most cases.

There is an exception which is dependent on the type of TextExpander Organization you have. If you made the choice to change your organization type from “closed” to “open” then individual members can have “private” snippet groups. The organization does not have any control of, or ability to see, the content of private groups. Members can also take private snippet groups with them when they leave the TextExpander Organization. Organization admin can see the usage of these snippets in aggregate statistics, combined with organization snippet usage. For more on closed vs open organizations see What’s the difference between closed and open organizations?

Step 3. Add snippet groups to the organization

  1. Create some groups. See How can I add groups to TextExpander?
  2. Organize your snippet groups for sharing. See How do I set up snippet groups for sharing.
    Tip: Create snippets on TextExpander.com or in the app. Drag and drop snippets into groups using the app.
  3. Make the groups part of the organization.

Setting a group to be managed by the organization has a few benefits:

  • Organization groups can be shared instantly with organization members.
  • Organization admin can see detailed usage statistics on organization groups.
  • The information in the groups remains with the organization even if the original creator leaves.

Add a group to the organization:

  1. From the desktop app: Click on the name of the group, then click on “Sharing” in the Group Settings.
    From the web: Click on the name of the group, then click on the Sharing tab.
  2. Once in the group’s Sharing tab, scroll to the bottom, under “Organization” select your organization.
    This group is now managed by the organization and the group’s admin.

Now set the default permissions.

Every member this group is shared with will have the default editing permissions. Permissions determine whether a member can edit the snippets in the group, or just use them. If you have a large number of members sharing a group, you probably want to limit the number of editors.

Select default permissions for new members:

  1. From the Sharing tab scroll to the bottom and set the default permissions you want all new group members to have. Once a member is part of the group, the group’s admin can change their permissions.

The permission levels include:

  • Group Admin
    Add members to the group, whether organization members or guests from outside the organization. Edit group member permissions. Remove members. Add, edit, and delete snippets. Only organization admin can delete a snippet group, which is done in the organization settings. Each group must have at least one “Group Admin”.
  • Edit
    Group members with Edit permissions can edit, add, and delete snippets in the group.
  • Read-only
    Group members without any edit permissions can use and expand snippets, but not edit them.

Step 4. Share groups with members

At this point your snippet groups are ready to share with your members. Your members are either:

  • in your organization, having accepted your invitation or signed in through their SSO dashboard, or
  • not in your organization, not having created their TextExpander account, or accepted the invitation.

You can share snippets with your members either way, but the method is a bit different.

Sharing groups with members in your organization

  1. Sign in to your TextExpander.com account. Click on the Add Member button inline with a group to go to that group’s Sharing tab.
  2. Click on the Edit button next to “Organization Members” and select members to add from the list of all members in the organization.
  3. Finish by clicking the Edit button again.
    The group will be immediately available to members.

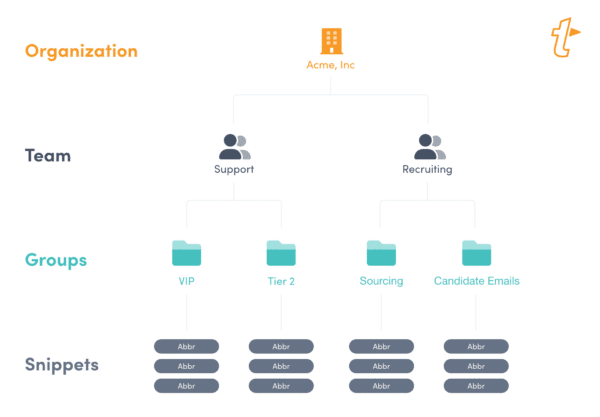
Teams

If you have a large number of TextExpander users, we suggest setting up Teams in your organization. This is a way for each department in a company to gather their own members and groups together.

Also, if a member is added to a Team, they can automatically have access to multiple snippet groups.

See Using Teams in A TextExpander Organization.

Group Visibility

Each team member will be able to see both their own private groups and any groups shared with them. Organization groups are not discoverable by members, only by organization admin. Groups must be explicitly shared with each member. The exception is groups in a Team. In Teams, all groups are viewable by all team members. For more on Teams see Using Teams in A TextExpander Organization.

Share groups with everyone using Auto-Join

If you have any groups you want to share with everyone in the organization, you can set that group to be auto-joined.

For example, you might want the whole company to share the Support and Ops groups, but you only want the Sales team to have the Sales snippet group.

To set a group to be auto-joined by every member:

  1. Sign in to your TextExpander.com account. Open your organization settings by clicking your account name in the upper right corner and choosing your organization name.
  2. Click the Groups tab, then check “auto-join” inline with the groups you want shared with everyone.

Sharing groups with users outside the organization

If you wish to add a member from outside the organization, a part-time contractor for example, or someone on your team who hasn’t joined your organization yet:

  1. Sign in to your TextExpander.com account. Click on the Add Member button inline with a group to go to that group’s Sharing tab.
  2. Click the Add Member button next to Guest Members.
  3. Enter their email address. To add batch of members, enter a comma separated list.
Share This Post
Not helpful Helpful

Take TextExpander for a test-drive

Try it for FREE

No credit card required

TextExpander
  • Start Free Trial
  • Pricing
  • Download
  • Features
  • Sign In
  • Webinars
Support
  • Support Home
  • Video Tutorials
  • Knowledge Base
  • Teams Support Center
  • Public Groups
  • Contact
Blog
  • Blog Home
  • Sales
  • Recruitment
  • Customer Support
  • Development
  • Tips
Company
  • About Smile
  • Jobs
  • Partner with Smile
  • Press
  • Smile Blog

© 2020 SmileOnMyMac, LLC dba TextExpander. TextExpander is a registered trademark.

  • Privacy
  • Policies