
We recently shared some TextExpander best practices from Customer Success Manager Rex Mann with tips on organizing and naming Snippets. Here are some more of Rex’s tips for identifying Snippets to create and how to document your Snippets.
If you’re new to TextExpander and need help with the basics, we encourage you to watch our TextExpander 101 webinar.
Not able to play the video? Click here to watch the video
Best practices for creating Snippets
Often, new users install TextExpander, stare at it, but can’t come up with a Snippet. There are limitless possibilities, and possibility can be paralyzing. Writers deal with this all the time—it’s called the blank page problem.
The trick to defeating the blank page problem? Simple: get something—anything—on the “page!” Going from zero to one is a giant leap, but getting from one to two is only one small step. Here are some tricks to getting from zero to one.
Use process mapping to identify useful Snippets
Often the challenge with TextExpander is thinking up useful Snippets to create. Two issues we often see:
- We don’t create Snippets because they struggle with the “blank page” problem.
- We create Snippets that we think will be useful, but in reality, we never end up using them.
The Suggested Snippets feature can help here, but to get the most out of TextExpander, it pays to spend a bit of time doing what’s called processing mapping, where you create a visual diagram of your usual productivity processes.
If you want to start small with process mapping, start by taking a couple of days to be mindful of what you do every day. When you recognize a task you perform often, stop and outline the process, specifically what keystrokes you press and what you type. Also, consider where you have to move your mouse and ask if there’s a way to accomplish that with the keyboard.
TextExpander can emulate many commonly used keyboard keys, like:
- Enter
- Esc
- Return
- Tab
- Arrow keys
Here’s an example. To create a new email in Gmail, you:
- Type the recipient’s email address
- Tab to the Subject line
- Type the subject
- Tab to the body
- Type the body of the message
- Type out a signature if it’s not inserted automatically
Let’s say you regularly send an email to your boss to send expense reports. You could create a Snippet to automate that task. Remember that one of our best practices is nesting Snippets, so the first thing you would want to do is create Snippets for all the major elements:
- Your boss’s email address
- The subject line
- The message body
- Your email signature
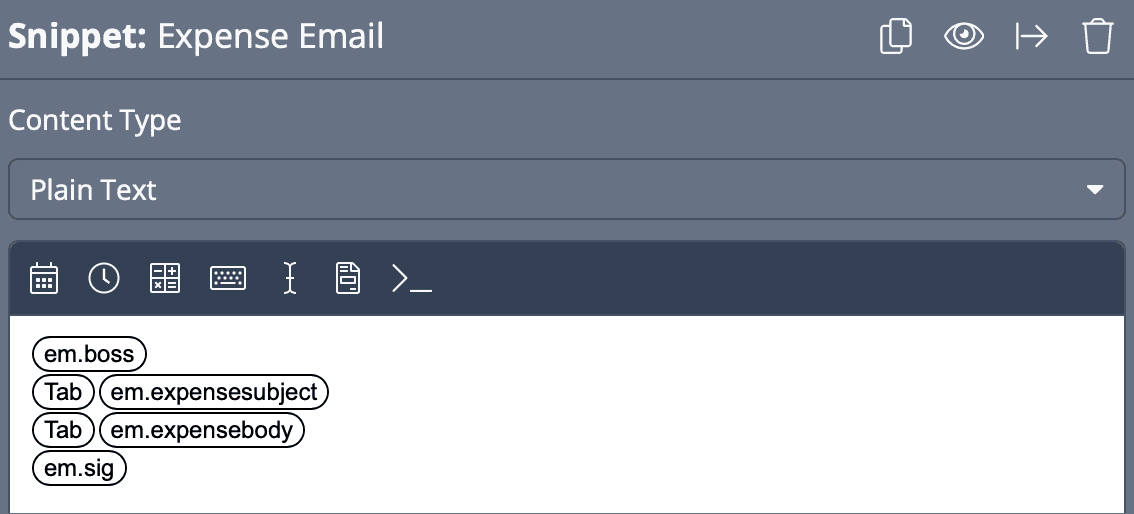
Let’s add a finishing touch.
Ask if you can use a Snippet in more than one place
The Snippet above works great for Gmail, but what if you sometimes send email in Apple Mail? Our Gmail Snippet wouldn’t work, because Apple Mail includes the CC field by default. So the workflow changes to:
- Type the recipient’s email address
- Tab to the CC: line
- Tab to the Subject line
- Type the subject
- Tab to the body
- Type the body of the message
- Type out a signature if it’s not inserted automatically
You could create two Snippets, one for Gmail and one for Apple Mail, or you could take advantage of Optional fields to make the Snippet multi-purpose by adding an optional tab.
Here’s how that Snippet looks in TextExpander. We’re using embedded Snippets instead of putting raw content in the Snippet which makes it more maintainable and also looks cleaner.
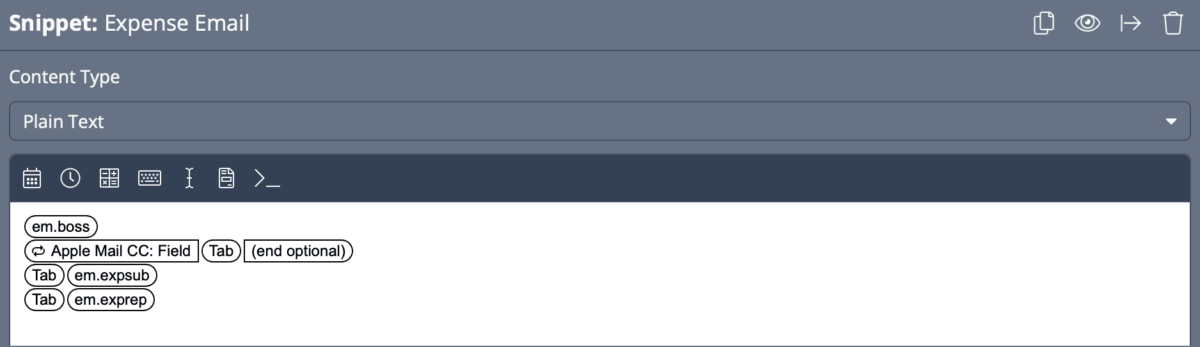
We made the embedded Snippet abbreviations especially verbose so the final Snippet is human-readable.
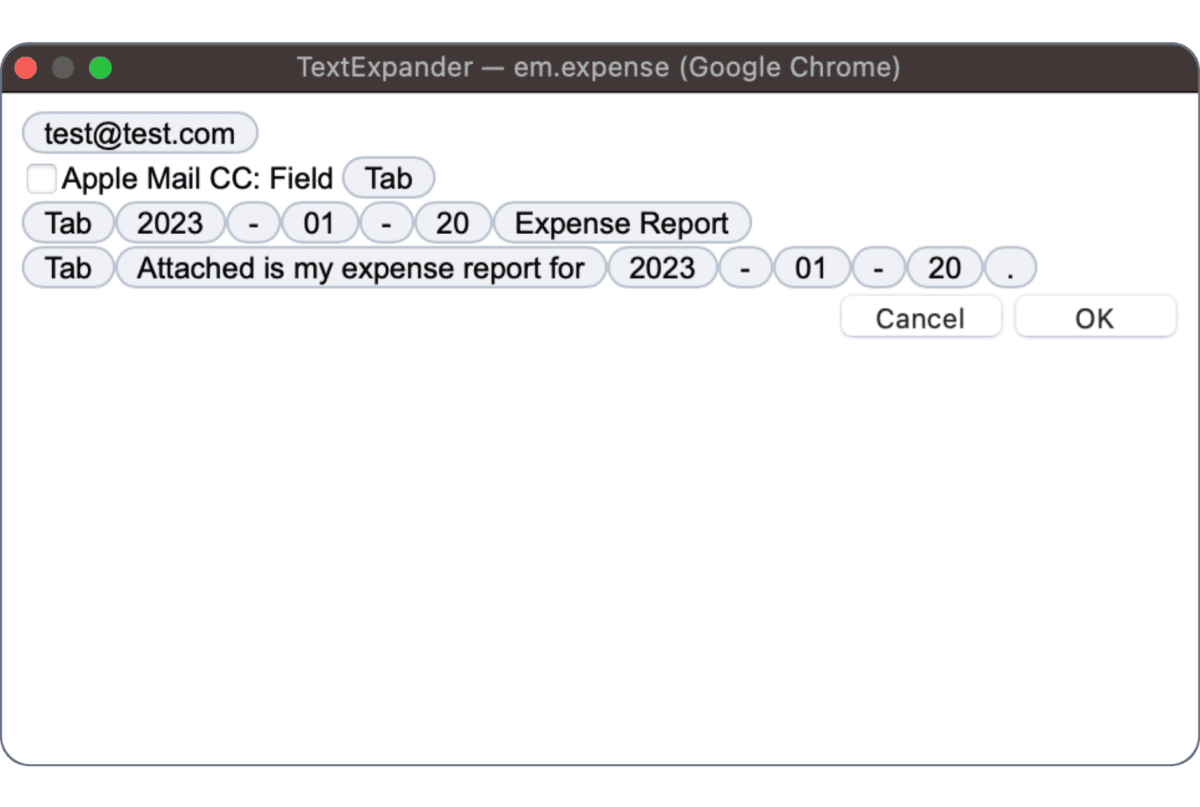
Here’s how the Fill-In Window looks when you trigger the Snippet.
Test snippets before sharing
Once you’ve created a Snippet, take a week to use it in your own workflows to ensure that it’s workable and does what you intend. Here are some things to consider:
- Does the Snippet function as intended, or are there rough edges you need to smooth out?
- Do the abbreviations and—if used—text in the Fill-In Window make sense?
- Are the Snippet abbreviations accessible? Can you type them easily? Will your team members also be able to type them easily? Or can you easily find them with inline search?
Taking a little time to “eat your own dogfood” can save you from frustration and embarrassment if a shared Snippet doesn’t work as intended.
Best practices for documenting Snippets
Ask any programmer about the key to good code, and they’ll say: documentation. That includes both comments in the code and well-named variables that clearly describe what they do. If you follow our best practices, you’ll have clear, descriptive Snippet labels and abbreviations that are explanatory and make them discoverable.
There are several ways to document TextExpander Snippets.
Make human-readable Snippet abbreviations
In our last installment, we discussed ways to make your Snippet abbreviations human-readable with Group prefixes. So if your Snippet label is “Email Signature,” the Snippet abbreviation could be “em.sig”. That’s much more readable than something like “;sig” or “xsig” but is still fewer characters to type than the entire signature.
Another advantage is when you nest Snippets. In the screenshot above, we use Snippet names like “em.expensesubject” and “em.expensebody” so that when you see those Snippet abbreviations embedded in another Snippet, you can easily understand what that Snippet does.
Of course, you want to avoid Snippet abbreviations that are longer than what they expand into, so you need to find a balance between Snippet length and readability. However, it’s hard to go wrong with erring on the side of readability.
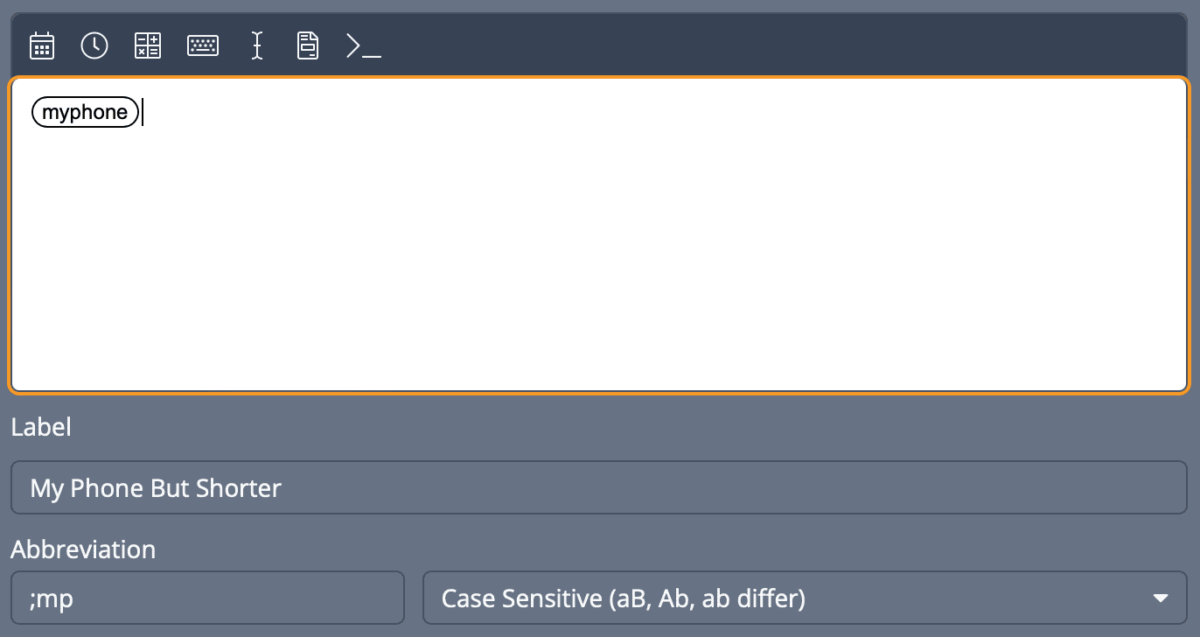
A potential solution is to first create a Snippet with a verbose abbreviation. Then create a secondary Snippet with a short abbreviation that nests the Snippet with the longer abbreviation. That way, you have one with a self-explanatory abbreviation for inline search and embedding and another one that’s quicker to type. And if you change the original Snippet, those changes are carried over into the nested Snippet. Nesting Snippets is a best practice.
Put basic instructions in Snippet labels
It’s good to put brief instructions in a Snippet label for Snippets that need them. A common example is when you have a Snippet that acts on content in your clipboard. Just add (Clipboard) to the end of the name so you know the Snippet will paste in whatever is in your clipboard.
For example, here’s a useful TextExpander Snippet that does nothing but insert the contents of your clipboard as plain text. This is super helpful when you want to copy and paste text without also copying over the formatting, like copying text from a web page and pasting it into a word processor. We named it “Paste Plain Text (Clipboard)” to make it clear that it expands clipboard contents.

Another thing you can do with labels for shared Snippets is to add your initials and the creation date so your peers know who to contact for questions about the Snippet and how “fresh” it is. Let’s look at another way to note that information in groups.
Use Group Notes
Every Group has a Notes field you should take advantage of, especially for shared Snippet Groups. Add these to your shared Group Notes:
- A brief explainer of what the Snippets are used for.
- Created by:
- Updated by:
- Reviewed by:
- Date updated:
This way, you know how “fresh” the Snippets are. If they haven’t been updated in a couple of years, maybe they’re not being used? Or maybe something broke? And if you have a problem with a Snippet, you can contact the creator to troubleshoot it.

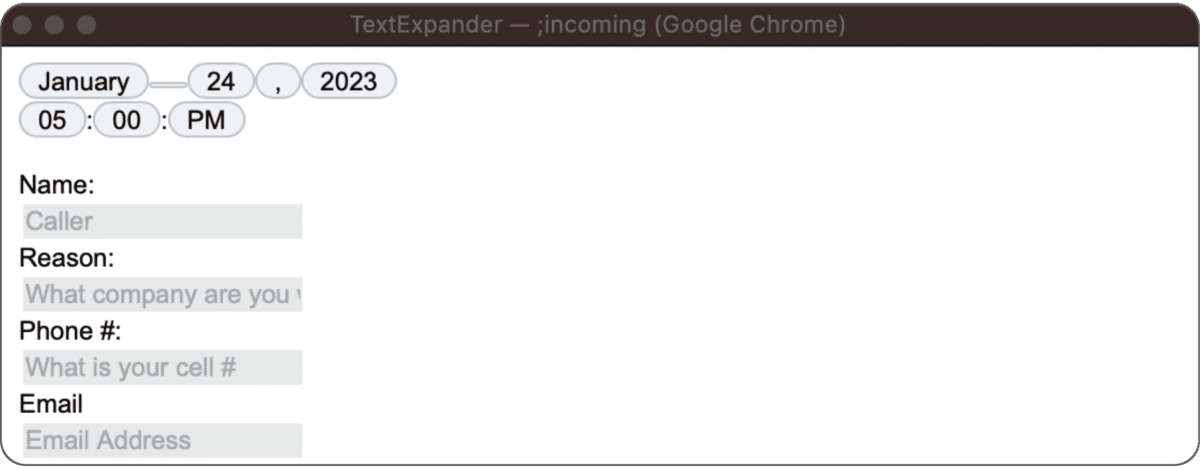
Leverage Fill-in Field names
When setting up Fill-in fields, give them instructive names. For instance, instead of just naming a phone number field “Phone Number,” call it something like, “What is your phone number?” The screen below is a Fill-in Snippet used by our sales team that reminds them to ask important questions, such as:
- What company the prospect is with
- Their cell phone number
- Why they reached out to us
- If there are any concerns we can address
Another way to add documentation to Snippets
Here’s one last method for documenting Snippets: leverage the name field in Optional sections to add instructions.
How does that work? Add an Optional section to your Snippet. For the Name, type out instructions for the Snippet. And then don’t put any content in the Optional section. Also, be careful to not add any additional returns or other characters to the intended Snippet.

When you expand the Snippet, the Fill-In Window appears with the Snippet content and the Optional section name, which acts as instructions. The checkbox usually used to toggle the Optional section does nothing, because there’s nothing in the Optional section.
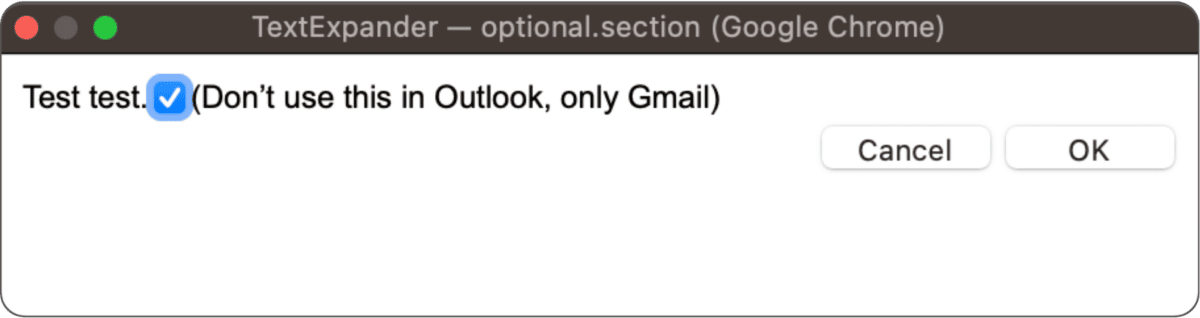
Of course, you should use this sparingly, because adding an Optional section means an additional popover to click through before expanding the Snippet. Only use it in situations where that level of intervention is warranted.
We hope these tips have given you some insight into better ways to use TextExpander. And if you don’t use TextExpander, has it whetted your appetite for learning more? Try TextExpander yourself with a 30-day free trial and discover what TextExpander can do for you and your team. When you’re ready, contact our sales team to supercharge your productivity. Team-based pricing starts as low as $8.33 per user per month.